This month’s tutorial is a two parter.
First off I’m going to show you how you can create your own digital brushes (something I eluded to back in November) and then a few tips to use those brushes and create your own paper or enhance an existing pattern paper.
Creating your own brush:
Go to File then select New.
In the menu type in the following
Width: 4 inches Height: 4 inches Resolution: 300 pixels/inch
Then click ok.
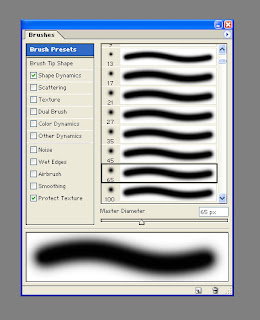
Now select the brush tool from the tools palette
Go to Windows and select ‘brushes’ – this is going to bring up your brushes menu.For my bubbles I chose a diffused brush at 65 points
First off I’m going to show you how you can create your own digital brushes (something I eluded to back in November) and then a few tips to use those brushes and create your own paper or enhance an existing pattern paper.
Creating your own brush:
Go to File then select New.
In the menu type in the following
Width: 4 inches Height: 4 inches Resolution: 300 pixels/inch
Then click ok.
Now select the brush tool from the tools palette
Go to Windows and select ‘brushes’ – this is going to bring up your brushes menu.For my bubbles I chose a diffused brush at 65 points
Now ‘draw’ your desired brush onto the canvas.
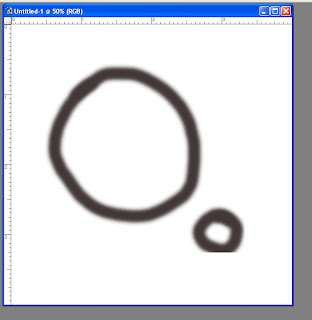
I redid my bubbles several times before I liked the results, so feel free to play around until your desired shape is achieved. Once you are happy go to Edit > define brush. This will bring up a box that will show a thumbnail of the picture you just created and a place to name your brush.
Name your brush and then click ok.
Tada!!!! You just created your very own brush:)
For my layout I actually created two brushes, one with a double ‘bubble’ and then a single one.
Name your brush and then click ok.
Tada!!!! You just created your very own brush:)
For my layout I actually created two brushes, one with a double ‘bubble’ and then a single one.

Playing with your brushes:
Just an FYI – brushes in the digital world work a lot like stamps in scrapbooking. You can ‘stamp’ with them, layer them, adjust the opacity, and even cover blemishes and dark raccoon eyes when working with your photos (hmm . . . I think I just might have outed myself there. LOL!)
Creating bubble paper:
Open up a new work space by going to File>New.
Width: 8.5 inches Height: 11 inches Resolution: 300 pixels/inch
I chose to make mine the traditional letter size so I could print it out on my printer.
Now go to Layers > New.
This creates a new layer on top of your background. I suggest you create a new layer between ever time you ‘stamp’ with your brush. Why do this? When you are working with various brushes sometimes you stamp one on and won’t like it, rather then starting over from scratch you can delete that particular layer and go right back to work.
Back to that bubble paper I was explaining - In your brush menu select ‘Scattering” this allows you to drag your brush across an area and it does exactly what the names suggests it scatters the design around. By clicking on scattering it not only selects that option but also allows you to adjust different options. Using the preview screen option on the bottom of the brushes menu I played around with the different options ( (size – in ‘brush tip dynamics’, count, jittering) until I got the look I was going for. Now you can drag your brush across your paper. It’s going to scatter it and make it look like you placed your bubbles randomly on the paper. (To note: I also checked ‘wet edges’ on the brush menu. This gives a watery blended effect to the brush.)
 After the first scattering of bubbles I used my second brush (single bubble) to go back and stamp in some of the holes I saw in my design.
Here is my finished paper that I printed out onto the green pattern paper from the this months kit:

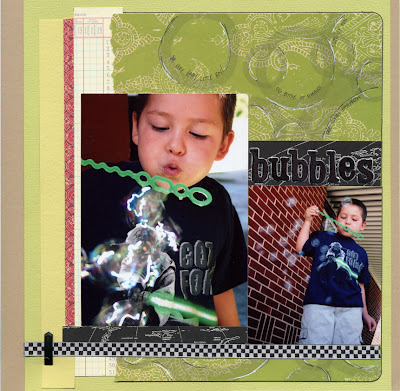 Once I started assembling my layout I realized my bubbles didn’t stand out as much as I had initially intended so that is why I went back with a black and white pen to roughly outline them.
 That concludes the tutorial for this month.
If you have any questions please feel free to post them on the digital board here as well as links to your own creations!
Happy Creating - Nicole


6 comments:
This LO is truly amazing. I looked at it before and thought WOW, where did she get that paper? I thought it looked like the kit but knew it was different. I love your attention to details.
Now that is clever and your explanation is great!
Thanks so much for teaching me how to do this, Nicole! I've always wanted to learn how to make my own, and you've made it so simple to do--now I'm off to try it myself!!
Thanks Nicole...great instructions!!
Nicole: I am going to try this, what a neat idea, I am always thinking about doing more with the computer for scrapbooking, now I may try it.
This is such a cool effect Nicole! Thanks for the instructions - I can't wait to try it!
Post a Comment