
It can be easy to pick out flowers from a patterned piece of paper or a flourish design that can be cut out and used as an accent to a card or layout. This paper has these adorable owls on it but they are pretty little when individually cut out. Little enough that they could be hard to have a focus on them so I took another route in using one of the owls as a design element. I used my circle punches and punched out one of the owls. I used slightly larger circle punches to punch mats out of matching solid cardstock so that my owl piece is now has become the focus on my card. The layers are also divided by adding a layer of foam tape between some of the layers so this adds some great dimension to this piece.
Solid Cardstock – Worldwin Papers
Patterned paper – Fifth Avenue/Manhattan collection/Autumn Leaves
Rub-on words – Luxe
Circle punches – McGill
White flower and mini brad – Making Memories
Glitter Dimensional Fabric paint – Tulip
Fluid Chalk stamp pad – Clearsnap
Zig Zag scissors - Fiskars
Friday, March 28, 2008
EMPHASIZE PART OF THE DESIGN
Thursday, March 27, 2008
March Hybrid Tutorial
How to distort a shape and then print out a template
This month I used this technique to create the large heart in my "Boot Love" layout.
I wanted it a little misshappen and rough looking to match the smaller stitched heart and since I hate to freehand anything I decided to take it to photoshop.
File > New
Type in Dimensions 8.5 X 11. Resolution 300 pixels/inch in the pop up menu.
Click ok.
(Just a quick note: I used a standard letter size so I could print this out on my printer. If you have a large format printer or are doing this all digital you can pretty much make this any size you need.)
Now you are going to Select the Custom Shape Tool.In Photoshop 7.0 it’s the little blobby looking icon above the eyedropper tool.
In Elements 6.0 it’s the Heart near the bottom of your tool palette.
I selected the heart shape but you could use any shape you like. Click on your document and while holding down the shift key drag a heart onto your new document. You’ll notice that Photoshop automatically fills in the shape with whatever color is selected as your foreground color, for what we are doing it doesn’t matter what the color is.
Now to make a more primitive heart that is uneven and not quite so perfect you will need to first hit ctrl-t. This is the hot key for ‘Free Transform’. With your cursor over your heart shape right click. You will now get a little menu that is part of the Free Transform functions. Click on distort and then skew to horizontally and vertically change your shape. When you are happy with the results double click on the shape (or in Elements you can also click the green check) and this commits the shape to your changes.
![]()
![]()
The right image is the free transform menu in Elements 6.0 the left is the same menu in Photoshop 7.0.
Click on the ‘create a new layer’ icon on your palette (or Layer>New>Layer) in 7.0 it’s towards the bottom of the Layers palette in Elements it’s on the top. Hold down the Ctrl key and click on the heart icon on the layers palette this will ‘select’ the heart shape and put those little dashes around the outside of your heart. Now with the new layer selected in your layers palette (not the heart layer) go up to Edit>Stroke. This brings up a menu and you’ll want to put in width: 10, color: black, center, then click ok.
This puts an outline around your heart shape. Now you can click and drag your custom shape layer to your little garbage can and your left with the outline in your new layer that you can print out and use as a paper template like I did on my layout.

Quick, easy and saved me a lot of time from trying to freehand the heart. Something I stay away from since I'm never happy with the results. :)
Tuesday, March 25, 2008
March Sketch #3

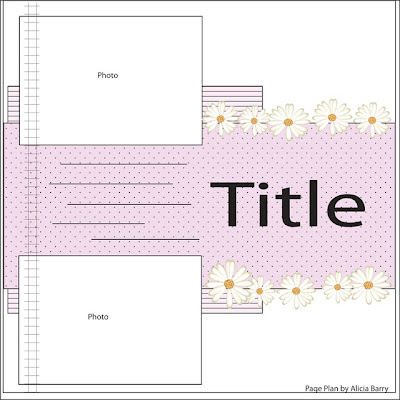
Our 3rd sketch this month is a card sketch that was designed by Alicia. It is another one of her fab Page Plans. Alicia's sketches are very inspiring and can be used for either layouts and or cards. We have several different takes on this sketch and hope you will join in on the sketches. Be sure to post them in the gallery and send them to Alicia to put up on her Page Plans site.
March Scrap Kit
Pattern paper - Autumn Leaves
Cardstock - WorldWin
Chipboard circles
Other:
American crafts Thickers
Flower
Bottle cap

March Scrap Kit
Pattern paper- Autumn Leaves
Cardstock - WorldWin
Chipboard
Ribbon
Buttons
Other:
White Sharpie

Thank you card designed by Elisa Kammerdiener
March Scrap Kit
Pattern paper - Autumn Leaves
Cardstock - WorldWin
Chipboard circles
Lace
Other:
American crafts chipboard thickers

March Scrap Kit:
Pattern paper - Autumn Leaves
Cardstock - WorldWin
chipboard alpha
Other:
liquid pearls
Leather strap
Monday, March 24, 2008
Using Bazzill Stitch'z Templates

This months Scrapkit, Addict and Little Pill kit ALL featured some of the new stitching templates by Bazzill. If you like the look of real stitching on your layouts, but getting out the sewing machine doesn't thrill you, these are just the thing for getting the look you want without the hassel. If you haven't used the templates before, they can be a little intimidating at first. Don't let them scare you, they're really much easier to use then you would think.
In order to use the templates properly, you need the following tools:
- the stitch'z template(s) of your choice
- a paper piercer
- embroidery floss or thin yard
- a cushioned mat such as a coluzzle cutting mat, a stamp mat or a mouse pad that you don't mind putting some holes in
- a darning or embroidery needle
When you thread your needle, only use a single thickness of floss. You will use less of it that way, and since you will be going back through some holes multiple times this will help to not bulk up those areas.
Lay your paper on top of the cushioned mat, then place your template in the desired position. Using your paper piercer, start punching the holes out until you have them all done

Once the holes are punched out, start stitching by going up through the first hole, and down through the second hole - this is called doing a "running stitch". When you get to the third hole, go back up again and double back down through the second hole. You are now doing a "running back stitch". 


Continue in this same fashion until you have filled all of the holes. In some areas, you will need to go back through a hole that you have already used in order to get to another area of your image. If you would rather not double up, you can cut your thread, tie a knot and start again if you want to, but since the underside will be concealed it really isn't necessary.
When you're done, simply tie a knot and cut off the extra thread. There! Wasn't that easy?! Use your image to add a special homemade touch to your layouts, or create a personal, handmade card that the recipient will love and cherish.
Saturday, March 22, 2008
March Sketch #2
Our second March sketch is designed by Alicia. It is another one of her amazing page plans. Be sure to join in with us in scrapping with the sketch and sharing your take on it.

Designer: Linda Beeson
Materials:
March IAAS Scrap Kit:
Solid Cardstock – Worldwin
Patterned Paper – Manhattan/Autumn Leaves
Heidi Swapp sticker dots
Other:
Fluid Chalk stamp pads – Clearsnap
Sticker letters – K&Co. and Sticko
Glitter Dimensional Fabric Paint – Plaid
 Who's this boy
Designer: Elisa Kammerdiener
Materials
March IAAS Scrap Kit
Pattern Paper - Autumn Leaves
Cardstock - WorlWin
Chipboard Alpha
Buttons
Other:
Journaling square by Foxycropper
Me and my big ideas rub-ons
Stampin Up Ink
Thursday, March 20, 2008
Happy Easter Card

This paper from the March Card kit, with its "Lily" like flowers, just screamed Easter to me. I decided to make a more "traditional" card, staying away from bunnies and focusing on the religious aspect of the day.
Tuesday, March 18, 2008
March Sketch #1

Best Buds by Elisa Kammerdiener
Be sure to check out Alicia's site called Page Plans and if you have used any of her sketches or plan on using them be sure to send her your layouts so she can put them in the gallery on her site.
Sunday, March 16, 2008
Out From Behind the Camera, March challenge.
Here is the new challenge for the month. A fairly simple topic, although not necessarily an easy one.
The challenge is to scrap a layout about your best physical attribute. What do you consider your best feature? For me it is my eyelashes. They are long and dark and thick. My Mum is exactly the same. I have always been complimented on them, (and hardly ever have to buy mascara).
Here's the sketch and my sample. Looking forward to seeing your take on the challenge. 


Friday, March 14, 2008
ADDING INTEREST TO PATTERNED PAPER
 I loved the flowers on this piece of patterned paper from the March I Am A Scrapaholic Kit so I cut them out. After I had cut out what I wanted which included the stems and leaves I "painted" the design. I used a bottle of Gloss Accents first of all. It has a fine tip to make it easy to place it on the cut out piece. For some of the areas I added more interest with blue glitter glue which is called Stickles. This was set aside to dry thorougly. When dry, I used a couple colors of Fluid Chalk stamp pads to rub those pads along the cut edges. This is typically called "inking". The great green shades that I used of these stamp pads just added to the colors that were already in the print.
A NOTE OF THANKS card
Designer: Linda Beeson
Materials: Solid Cardstock – Worldwin PapersPatterned paper – Manhattan collection/Autumn Leaves (flower cut from one of the prints)
A note of thanks stamp – Hero Arts
Fluid Chalk stamp pads – Clearsnap
Stickles – Ranger
Gloss Accents – RangerRhinestone – Me & My Big Ideas
Tuesday, March 11, 2008
It's all about the little added touches
You will be surprised just how much those added little touches go a long way on a simple little card.
 products used are from the March Scrapaholic kit:
WorldWin cardstock
Autumn Leaves pattern paper
Ribbon
floss
button
Other:
Scenic Route chipboard square
Friday, March 7, 2008
Mixing Patterned Papers
One of my favorite card techniques is mixing patterned papers. And this month's kit makes it super easy for you to do! The papers in the March Kit coordinate beautifully and give you the ability to create fantastic projects!
You'll need: (All items from the MAR 08 Kit, except punch, ink and scissors)
(1) Worldwin Cardstock color of your choice
(3) Autumn LeavesPatterned Papers
(1) Heidi Swapp Glossy Polka Dot
Heidi Swapp Metallic Letter Stickers
Flower punch (can also be hand cut)
Ink (0ptional)
1. Cut cardstock to 5" x 10", fold in half. Finished card will be 5" x 5".
2. From patterned paper, cut (3) blocks in varying sizes. Ink edges.
3. Adhere patterned paper blocks to front of card.
4. Cut patterned paper strip approximately 1/2" wide, trim with decorative scissors. Adhere to lower portion of card.
5. Punch or cut flower shape and adhere to card.
6. Use Glossy Dot for center of flower.
7. Using Metallic Letter Stickers, adhere sentiment to top right side of card.
Thursday, March 6, 2008
Friends Card
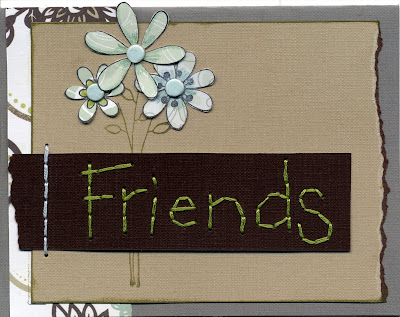
Supplies:
scrap kit - Autumn Leaves Manhattan papers, WorldWin cardstock, Prism cotton floss, Bazzill In Stitch'z Template (friends)
therapy kit - Heidi Swapp glossy chipboard circles (flower centers)
stamps are from my stash and are from the Kim Hughes Collection at Cornish Heritage Farms.
Monday, March 3, 2008
DOODLING FOR ADDED ACCENT

The papers and other supplies in this March kit from I Am A Scrapaholic match so well and an added bonus is even more matching with this fabulous Metallic marker from American Crafts. For this card I added some doodles around my circle. This helped tie everything together since it is the perfect color to go with these great chipboard flowers from Heidi Swapp.
AQUA FLOWER card
Designer: Linda Beeson
Materials: Solid Cardstock – Worldwin Papers
Patterned paper – Manhattan collection/Autumn Leaves
Metallic pen – American Crafts
Diamond Glitter Dimensional Fabric Paint – Tulip
Rhinestones – Me & My Big Ideas
Circle template – Coluzzle
Fluid Chalk stamp pad – Clearsnap
Chipboard flowers – Heidi Swapp
Sunday, March 2, 2008
Lovin' the March Kit!!!

It is crammed full of delicious paper from Autumn Leaves, embellies from Heidi Swapp, Making Memories, and Maya Road, to just include a few!! My absolute favorite part of this month's kit is the Bazzill IN-STITCH'Z templates--This template allows you to create beautiful handsewn designs on your layouts--and the fabulous part of it is that it is SO EASY!!! On my layout, "YOU SHINE", I handstitched the bird and cut it out of the WorldWin cardstock included in the kit--within 15 minutes I had a really cute, funky embellie to add onto my layout!! I hope you enjoy this month's kit as much as I am!!!

