Thursday, January 31, 2008

Watercoloring with Inkpads and a Waterbrush

Watercoloring with Inkpads and a Waterbrush
by Lynn


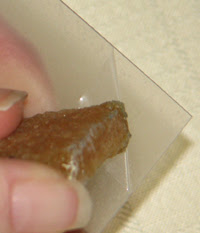
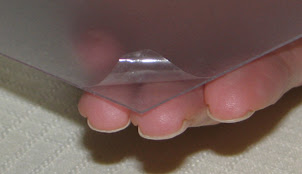
First let me start with the "light bulb" moment. I love using clear acrylic to create my own embellishments and clear albums. The anoying part is getting the protective film off the pieces. A Xyron Adhesive Eraser lifts the edge of the film effortlessly. Oh my word!!!! I could not believe how slick it worked and why didn't I figure it out sooner.


Supplies:
A piece of clear acrylic -with the protective film removed from at least 1 side.
Inkpads
Waterbrush -filled with water
Papertowel
Prima Paintable Page

One Method

Step 1:
Press the inkpad onto the piece of clear acrylic leaving a puddle or smug of ink.

Be sure the brush tip is wet and create a small puddle of water. This will allow you to pick up just a little bit of water when desired.

Using the brush 'pick' up ink from the ink spot. Don't worry about the ink spot drying out. 
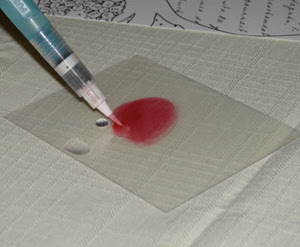
The brush is always wet. And you can use the water puddle to mix a little water into the ink spot if needed.

Step 2:
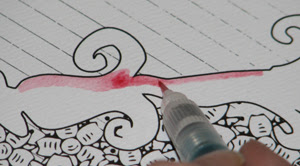
Apply the ink to the paper.

Start slowly. I found long strokes dried faster creating more lines.

And to fix those lines I picked up a little water from the small water puddle. Or you could squeeze the brush a little to add water but I am not an 
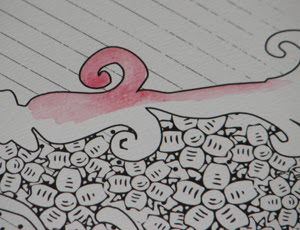
expert painter and tended to get more water than I wanted. To control the color depth (darkness) I used more water to create a lighter color and more ink for darker.


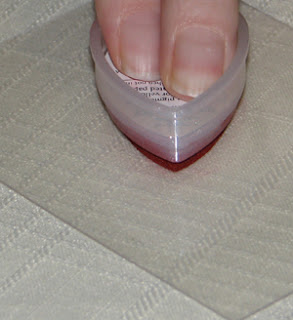
Another way to use the inkpads and waterbrush is to touch the brush right onto the inkpad. BE CAREFUL if you do this. Remember you are adding water to your inkpad -even if you do not actually squeeze water onto the inkpad. For me I was not worried about ruining this inkpad as I have used the heck out of it and it is almost time to replace it. And when I was done I just pressed the inkpad onto the piece of clear arcylic forcing the excess water out.


To clean the waterbrush of ink between colors simply squeeze the waterbrush onto a paper towel until it is clear -quick and simple.


Finished LO coming...

January Kit Card


Collage Press Grayson Hall/ Market Paisley
Prima Paintables
7 Gypsies brad
Watercolor Pencils and Blender pen
IAAS Die Cut Velvet Bird
Rubons: Creative Imaginations, Karen Foster

Wednesday, January 30, 2008

I *heart* U Valentines Card


A fun card to give to that special someone in your life--it would be perfect for a parent or a child--or perhaps from your child to their teacher with the saying "AND ALL THAT YOU DO FOR ME" on the inside...(being a teacher myself, I would LOVE to get something like this from a student!!)
The January Prima papers were used with this along with some watercoloring and Collage Press papers embellishing the chipboard letters--Have extra buttons laying around your scraproom? Use them to add a funky element to your card, along with a stamping technique on the chipboard letters--

Tuesday, January 29, 2008

Get Creative with Scraps!


I love the papers in the January scrap kits. They are so fun to play with! I made this card using scraps from the kit. The papers are scraps from the Collage Press Grayson Hall Collection.

This was a really simple card to create. I used some cardstock that comes in the kit and made a 6X6 card. The patterned paper on the front is two different sizes. The black patterned paper is 4X4 and the "notebook" style patterned paper is 3 X 5. I used a Heidi Swapp stamp for the word love and acrylic stamps to create the other two words. The flower is a Bazzill flower and the ribbon is from this month's kits. To finish of the card I simply inked the edges and WaLa! Instant card!

Saturday, January 26, 2008

February Sneak Peek!!

Check out the sneak peek for February's kit. Love is in the air and IAAS has some wonderful papers from SEI combined with hearts, crowns, glitter and sparkle, to help you put together some amazing layouts! And, can I just say, the card kit is TO DIE FOR! Hope this isn't too much of a tease...:)


Friday, January 25, 2008

Quick and Simple Valentine Card


I love using up scraps to make cards. That way you don't have a pile of scraps sitting there and the end result is a cute card that someone will love.

For this card I used the Collage Press Patterned Paper from the January kit along with some scrap Bazzill for the heart.

I drew the heart and then used an xacto knife to cut out the center. That way you can resuse the center portion. Added a little flower and bling along with some ink and doodles...and wala :)

Thursday, January 24, 2008

Quick and Easy!


I made this card using scraps from the January Kit. The card can be used for Valentine's Day, or any other time of the year that you want to tell someone you love them.

The paper is a mix of Collage Press, Cardstock and the Prima Paintables. The angels wings are covered in Stickles for some sparkle and color. I added some of the black and white Prima ribbon to help tie in the black and white image to the rest of the card, and to add a little texture. I used a punch to make a little heart shape in the bottom corner of the card. Super quick, easy and elegant.

Wednesday, January 23, 2008

Easy Valentine card...

Here is a really easy Valentines day card to make with your left over scraps.

I used Collage Press papers from the January kit with some black bazzill and Scenic Route Heart chipboard shapes. If you don't have any chipboard hearts it's not that hard to make your own from a piece of chipboard. Just draw it out and cut it out and cover it with your scraps of paper. The I love you rub-ons are from Pebbles inc. but it looks as if it was just written on the card. I took a black pen and drew some lines and circles to give it a fun little accent. The card measures 4.5x4.5. Thanks for looking.

Tuesday, January 22, 2008

VALENTINES CUTIE

Does this little guy say Valentines Day wishes or what? The papers are from the January Kit from I Am A Scrapaholic but by just adding a couple themed stamps they were transformed to a Valentines Day greeting.

A note to remember on stamping: I stamped the little cupid mailman on a separate piece of cardstock and did a small amount of coloring in and added some glitter glue. This way I could experiment and I could also stamp it a couple times to get a good image, plus I could accent it with this red, scallop circle to help it stand out better. If I had tried to stamp him on the card itself, I would have possibly not gotten a good image the first time and I might not have liked the way I colored him. By doing it on a separate piece, I have room for errors and I also have room to experiment.
Another note is that I accented the stamped black flourish design with the Diamond Glitter Dimensional Fabric Paint. This is a kind of glitter glue but when it is dry, you still see the color and the image that is under it. A great way to add just a little bit of glitter.
Materials:
Solid cardstock – WORLDWIN Papers/Crimson Red/Treasures
Patterned paper – Malta and World Traveler Cream (reverse side of both)
Grayson Hall/Collage Press
Diamond Glitter Dimensional Fabric Paint – Tulip
Red Stickles – RangerRed Distress stamp pad – Ranger
Flourish stamp – BasicGreyCupid mailman – Crafty Secrets
“Smitten” word stamp – Kim Hughes Collection/Cornish Heritage Farms
Scallop circle punch – Marvy

Monday, January 21, 2008

Thinking of you CARD

Holly Pittroff

I used Collage Press/World Traveler Cream and Prima Paintables papers for this card. TFL!

Sunday, January 20, 2008

Valentine & Everyday Cards

Watch for new cards and inspiration from the Design Team!


Saturday, January 19, 2008

LOVE with Attitude contest for February

It's all about love in February, so we're celebrating by having a contest at IAAS.
Make a layout that shimmers, glitters and has a title with some attitude! (We have the cutest Thinkables Inkables "attitude" stamp roller in the February kit!)

Upload your layout(s) in the “February LOVE Contest” of our Open Gallery, and you could win a prize package from SEI, the papers for our February kit! Our design team will be selecting the winner at the end of February. Stop by just to see what our DT is doing with the kit throughout the month and enter as many layouts as you like! So get those creative juices flowing and good luck!

Contest timeline: January 25 – February 25

NOTE The prize package from SEI will include their new releases from CHA in February! So there is no way to post a photo until I bring the package home from the show. I should be home on the 14th. I would really like to thank SEI and Chelsie for this wonderful prize!

Friday, January 18, 2008

Use your scraps! 3D Embellishments

I often find myself with a lot of little scraps and strips of paper after finishing a project and I really hate for them to go to waste. (My scrap drawer is overflowing because of this!)


Here's a great way to use up some of those scraps! These little 3D embellishments are a snap to make and work great for cards, projects or that little extra touch you need for a layout. Make a few and save them for later. =)

(Click on picture for a larger view)

You'll need:
Patterned paper of your choice
(2) circle punches, one slightly smaller than the other (I used a 2" punch and a 1 1/2" punch)
Foam squares to create the dimension
Stamps, stickers, flowers, felt or other embellishments of your choice
Instructions:
1) Punch one circle using each punch
2) Embellish the smaller circle with ink, stamping, flowers, simple sentiment, etc
3) Adhere the smaller circle to larger one by placing a foam square underneath sandwiching the two circles together
Try using two different colored papers for a new look; letter stickers for a tiny monogram detail or smaller stamps for a sentiment and place on a handmade card.
Enjoy! And don't forget to upload your work into the gallery. We'd love to see your creations!

(Click on picture for a larger view)
*All items are from the I AM A Scrapaholic January 08 Kit with the exception of Making Memories Foam Stamps, Brads and Ink.

Thursday, January 17, 2008

Another Becky Fleck sketch from the IAAS DT

The design team picked this awesome 2-page sketch to show of the products from this month's kit. Take the sketch challenge and upload it into the gallery. We'd love to see your work!

"A day @ the fair"
Elisa Kammerdiener


"Finley"
Becky Thackston


"destination: unknown"
Holly Pittroff


"Time to redefine me"
Kary Lewis

Tuesday, January 15, 2008

Creating with Ranger Photo Nibs

I have a confession to make. I have never used the Ranger Photo Nibs before. When I saw that they were featured in the February Kit from I Am A Scrapaholic I was intrigued. I was interested in finding out what I could do with them. Here are just a couple of samples you can do using the Ranger Photo Nibs from the February kit from I Am A Scrapaholic.


In this project I used the Ranger Photo Nibs to paint a stamped image. As you can see I used more than one different color in coloring my image. The Nibs were easy to use. I found that I could used a broader brush stroked on larger areas and use the finer point tip to get into those tricky tight corners.


With this layout I colored a part of a black and white photo that I wanted to higlight. For more depth I ended up using two different colors of Ranger distressed ink to give it sort of a 3D effect. Again using the Ranger Photo Nibs was so easy in getting to those small areas and for creating the layered effect on the flowers.
Supplies Used:
I Love You Card
Paper - Collage Press
Flowers - Making Memories and Fancy Pants Designs
Buttons - Making Memories
Ribbon - Prima
Ink - Versamark (edging), Colorbox (coloring image)
Rubons - Doodlebug Designs
Stamp - Scrapmode
All items execept rubons Stamp and Colorbox ink featured in February I Am A Scrapholic Kits


Small Blessings
Paper - Collage Press
Cardstock - WorldWin
Flowers - Making Memories and Fancy Pants Designs
Buttons - Making Memories
Ribbon - Prima Marketing
Ink - Ranger
All items except Ranger Ink featured in Februrary I Am A Scrapaholic Kits.

Sunday, January 13, 2008

Becky Fleck Sketch from the IAAS DT

Check out the Becky Fleck sketch interpretations from Kary and Becky. Take the challenge and upload it to our gallery.

"{true friends}"
Kary Lewis

"danger"
Becky Thackston

Saturday, January 12, 2008

SPC Acrylic Album - Little Pill #1 Kit

I had SO much fun making this acrylic album! All of the acrylic "pages" come in the same rectangular shape (4" X 8"), but I cut them so they were staggered. I used the MM Pebble Clips from the scrap kit for my "page turners". The January kit products were perfect for this kind of album. TFL!


Close Up


Close Up


Close Up


Close Up

Products used from multiple January Kits:

Collage Press Grayson Hall/Malta, Daydream, Postmark, Market Paisley
American Crafts Velvet letters: black
Prima Say It In Crystals
Making Memories Pebble Clips: Noteworthy
Fancy Pants Flowers
7 Gypsies photo turns
Prima Ribbon
IAAS butterfly die cut
Saturday Pond Crafts acrylic album
Making Memories Flocking & Foil kit

LOOKING AT THE PAPER IN A DIFFERENT WAY

My first thought in looking at these papers by Prima was to see what flower I would want to color in and what color I should make them. As I took at look at a scrap on my desk (yes, I just love scraps on me desk, so much inspiration comes from them!), I wondered what would happen if I left the flowers and vines white and colored the background? This is the result. Again, I reached for my watercolor crayons and watercolor brush. I like to take the brush tip to the end of the crayon and "take" color off of the crayon. With this paper, it is easy to keep adding coats of color until you get the intensity you were looking for. The ending was simple, I added a few self adhesive pearls and my card was finished.


Here's a close up look at the flower that was left without color being added to it and my pearl accents.

Friday, January 11, 2008

PAINTED FLOWER CARD

There is so much that can be created with these Prima Paintable papers. The whole piece, of course, or just zero in on one section.

For this card I picked out one of the more prominent flowers and cut it out. Next, I used my Watercolor crayons and my Watercolor brush to add color to the cut out design. Another plus to this paper is how much water and painting it will take. It is a great watercolor paper all on its own.

I decided to make this a two tone flower and when the green areas were dry, I went over them with the Diamond Glitter Dimensional Fabric paint. What I really like about this particular form of "glitter glue" is that you can still see the underneath color when it is dry. I coated the leaves with green Stickles. I choose that kind of "glitter glue" for that area because of the intense amount of glitter that you get when it dries. The green portions of this flower already had what look like typed letters or words on them. I added to that look with some stamped images on the card itself to help tie all of this together and to give my card a theme.


In this close up you can get a better idea of the glitter look that was added.


Materials:
Solid Cardstock – WORDLWIN Papers/Totally Tan/DoubleMates
Patterned paper – Grayson Hall/Collage Press and Paintables/Prima
Watercolor Crayons and Waterbrush
Peeled Paint Stickles – Ranger
Diamond Glitter Dimensional Fabric paint – Tulip
Stamps – Printworks, Stampin’ Up and American Art Stamp
Circle Template – Coluzzle
Ancient Page and Fluid Chalk stamp pads - Clearsnap

Thursday, January 10, 2008

Here's the Becky Fleck sketch #2 for January. Check out Mary Jo's take on the sketch!


Girlfriends

by Mary Jo Arthur


Take the sketch challenge and make sure to post it in our gallery!

Tuesday, January 8, 2008

January hybrid/digital tutorial

This month’s tutorial is a two parter.
First off I’m going to show you how you can create your own digital brushes (something I eluded to back in November) and then a few tips to use those brushes and create your own paper or enhance an existing pattern paper.

Creating your own brush:
Go to File then select New.
In the menu type in the following
Width: 4 inches Height: 4 inches Resolution: 300 pixels/inch
Then click ok.

Now select the brush tool from the tools palette
Go to Windows and select ‘brushes’ – this is going to bring up your brushes menu.For my bubbles I chose a diffused brush at 65 points


Now ‘draw’ your desired brush onto the canvas.


I redid my bubbles several times before I liked the results, so feel free to play around until your desired shape is achieved. Once you are happy go to Edit > define brush. This will bring up a box that will show a thumbnail of the picture you just created and a place to name your brush.
Name your brush and then click ok.
Tada!!!! You just created your very own brush:)

For my layout I actually created two brushes, one with a double ‘bubble’ and then a single one.


Playing with your brushes:
Just an FYI – brushes in the digital world work a lot like stamps in scrapbooking. You can ‘stamp’ with them, layer them, adjust the opacity, and even cover blemishes and dark raccoon eyes when working with your photos (hmm . . . I think I just might have outed myself there. LOL!)
Creating bubble paper:
Open up a new work space by going to File>New.
Width: 8.5 inches Height: 11 inches Resolution: 300 pixels/inch
I chose to make mine the traditional letter size so I could print it out on my printer.
Now go to Layers > New.
This creates a new layer on top of your background. I suggest you create a new layer between ever time you ‘stamp’ with your brush. Why do this? When you are working with various brushes sometimes you stamp one on and won’t like it, rather then starting over from scratch you can delete that particular layer and go right back to work.

Back to that bubble paper I was explaining - In your brush menu select ‘Scattering” this allows you to drag your brush across an area and it does exactly what the names suggests it scatters the design around. By clicking on scattering it not only selects that option but also allows you to adjust different options. Using the preview screen option on the bottom of the brushes menu I played around with the different options ( (size – in ‘brush tip dynamics’, count, jittering) until I got the look I was going for. Now you can drag your brush across your paper. It’s going to scatter it and make it look like you placed your bubbles randomly on the paper. (To note: I also checked ‘wet edges’ on the brush menu. This gives a watery blended effect to the brush.)


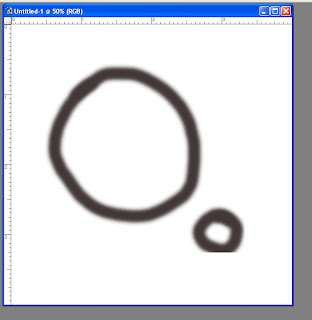
After the first scattering of bubbles I used my second brush (single bubble) to go back and stamp in some of the holes I saw in my design.

Here is my finished paper that I printed out onto the green pattern paper from the this months kit:


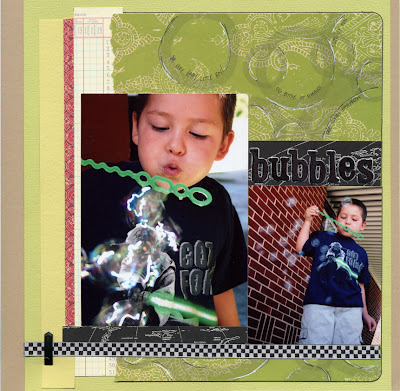
Once I started assembling my layout I realized my bubbles didn’t stand out as much as I had initially intended so that is why I went back with a black and white pen to roughly outline them.

That concludes the tutorial for this month.
If you have any questions please feel free to post them on the digital board here as well as links to your own creations!

Happy Creating - Nicole