This month's kit has been so much fun to play with!! There are so many different things that you can do with the Rusty Pickle patterned paper. I'm going to show you just two ideas I came up with--
If you grab your craft knife, some Diamond Glaze, adhesive (I chose liquid glue), and your hole punch, you're all set to make some cute "epoxy" looking buttons or embellishments from your patterned paper.
I first cut out the shapes I wanted to use from the Rusty Pickle "Pop Star" paper. Make sure to "back" the hand cut shapes with a solid chipboard or heavy cardstock. Not doing this may make the edges curl up after adding the Diamond Glaze.
Next, simply layer on the Diamond Glaze completely over the top of your shape. Let dry at least two hours before you decide to punch button holes into the middle of the shape!
Another technique I used on this layout was to hand cut the doodles from the "Ashley" paper and using the doodles as my flower stems. See what cute little embellies you've just made? Layer them onto your layout for a fun technique--I choose to use my "buttons" as the center of flowers--
I hope you try some of these techniques with your September kit!! I think you'll really like what you create using the patterned paper for custom embellishments!
Happy Scrapping!!
~~Kary
Sunday, September 28, 2008
Making cute little embellies from your patterned paper
Friday, September 26, 2008
Final September sketch
This 3 picture layout was super fun to play with! Try your hand at it and upload it into our gallery!

"boys ahoy"
Nicole Stark

"u inspire me"
Holly Pittroff

Instead of the chalk pencils in the Therapy kit, I used my watercolor pencils with a water brush for this one. Too fun!
Wednesday, September 24, 2008
Dew Drop Inks
I am an ink girl. LOVE them. If you are like me you have tons and tons of inks everywhere. I have several favorite brands of inks but one of my top favorites are the Dew Drop inks. What I really love the most about these inks - the packaging for one. The come in tear drop shapes which are so easy to use if you are trying to ink the edges of your layout/project. AND for a fun effect...you can use the ink as a stamp and just stamp on your project to make flower petals. It is a quick and easy sunflower ;)
The second think I love about Dew Drop inks would be the consistancy of the inks. When I am wanting to distress a project I don't want to have to continue inking the edges over and over again to get a good, thick border of ink. The Dew Drop inks are nice and thick so that one swipe of the ink pad and you had a great color. And the range of colors that are available are fantastic.
So if you haven't tried a Dew Drop ink yet...what are you waiting for. Get just one or two...give them a try...and I am sure you will fall in love with them too.
Thursday, September 18, 2008
Out From Behind the Camera Layouts from the DT
Alicia's OFBC series sketch rocks this month (again :)). Here is Alicia's challenge for the sketch:
This month your task is to create a layout centred around the theme: "A Day in my life". You can interpret that any way you like.
Once again here is Alicia's awesome sketch...
and her layout...
'In my shoes'
Alicia Barry
'chaos'
Susan Kleist
'Today'
Mary Jo Johnson
'Super Star'
Laura Achilles
Little Pill Kit ~ Acrylic Album ROCKS!
OK. I had SOOO much fun making this acrylic album showcasing my son's first grade school year. There were so many fun "potential" embellishments :) within the Rusty Pickle papers for my theme! I haven't had this much fun making a min-album in a long time.
If you purchased the therapy kit, make sure and show off your album in our gallery.
"1st grade moments"
Holly Pittroff
fall activities
100th day of school
smaller scanned examples of my son's first grade work...love this part! :)
fun journaling about my son at age 7
classmates
field day
last day project
Supplies from September kit:
Rusty Pickle Pop Star/Miley, Zac, Dylan
Prism Cardstock: white
Rusty Pickle Pop Star tag set
Bo-bunny Press Shabby Princess collection
American Crafts Red & White Checked ribbon
American Crafts Tangerine Chit Chat Thickers
Cloud 9 Red & Blue Vellum Flowers and Pieces
Acrylic Album
Around the Block Starter Chalk Set
Tsukineko Memento Dye Inkpads: Cantaloupe, Ladybug
Blue Ric Rac
Supplies from previous IAAS kits:
BasicGrey chipboard numberpile
Maya Road Office sheers scallop cards
American Crafts Blue slick writer
American Crafts thickers: playroom, jewelry box, gift box
Colorbox Chalk Ink: Azurite
Heidi Swapp white acrylic paint
Making Memories Vintage Funky – Deep Sea acrylic paint
Tuesday, September 16, 2008
A few finishing touches
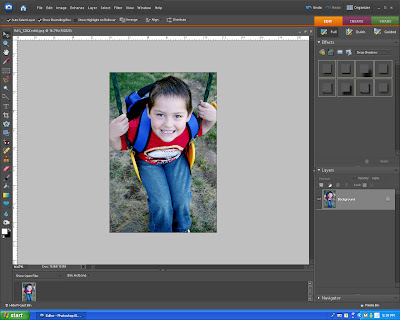
Last month I shared how I proof my photos using adjustment layers and photo filters. This month I’m going to share a few more finishing touches – using the burn tool and making a storyboard. Both are very simple and can be done in just a few steps.
First off the burn tool.
Open your photo and then go to view > zoom out. This will zoom your photo out and help when burning the edges of your photo.
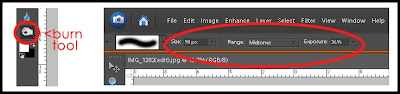
 Click on the burn tool icon in the tool palette. It’s the little hand icon. Then at the top of the screen put in these settings:
Size: 90px Range: Midtones Exposure 35%
Click and drag the tool around your photo to darken the edges. You can go back over some areas to make it as dark as you like.

Photo after using the burn tool.
 Stop here and save your photo.
Creating a storyboard is very simple and often used by photographers to showcase a series of photos. I’ve also seen it used to highlight a favorite photo when placing them into blog posts.
Go to Image > Resize > Canvas size
 In the pop up menu put in the following:
Width: 150 pixels Height: 150 pixels and click on the relative box – click ok.
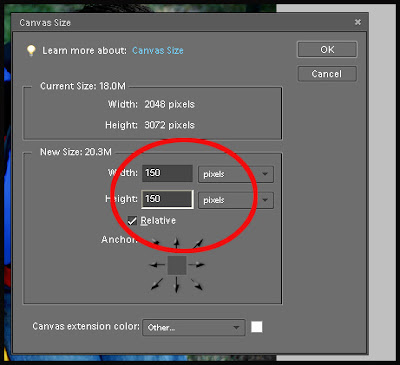
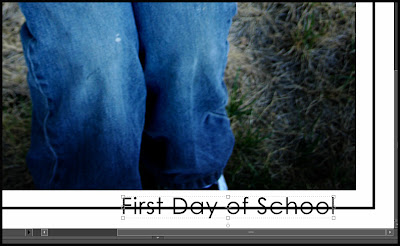
Your photo now will have a thick white border all the way around it.
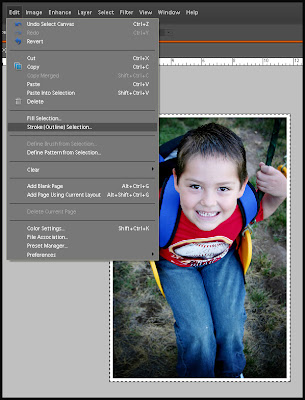
Hit ctrl-a (select all) – selects the whole canvas putting the little marching lines around the edges.
Go to Edit > Stroke
 Select the following in the pop up menu:
Width: 10 px Color: Black Location: Inside

Go back to Image > Resize > Canvas size
Pop up menu:
Width 150 pixels Height: 150 pixels click on relative box – click ok.
Now you’ll have a white space around your photo. A small black outline and then another space of white canvas.
Click the type tool in your tool palette and click on your photo and type subtitle. Click on the move tool and move type into position over lapping the black border.
 Click on the background layer in the layers palette, click on the eraser tool, and now erase the part of the black border than is going through the subtitle.
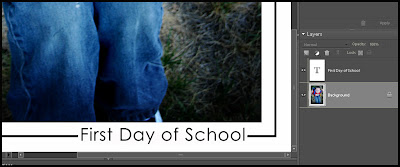 You have now created a very simple storyboard:)
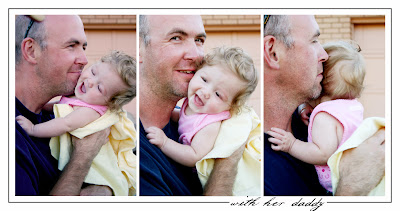
 Here is another example using a series of snapshots to show the bond between father and daughter.
Monday, September 15, 2008
September OFBC Challenge.
Who's ready for a new challenge. This month your task is to create a layout centred around the theme: "A Day in my life". You can interpret that any way you like.
Of course, you have a new sketch to work from, which by the way, I have tied in specifically with the papers from the kit this month:
Here's my sample layout. Look out for more from the rest of the DT.
Sunday, September 14, 2008
Prima Marketing Journaling Sheets
You've seen the I AM A Scrapaholic Design Team do some fabulous things with this month's kit and the Prima Marketing Journaling Sheets. Holly created an absolutely adorable layout using the journaling sheets exactly as they were intended, for journaling. Check out her project a few posts down, you're sure to be inspired! Becky used each of the sheets to create an amazing mini book. Each page is unique and I love how her project turned out.
It should be no surpise that I used the journaling sheets to create a card! =) The folded journaling sheet is the perfect size for a quick, all occasion card. I used the scalloped edge journaling sheet, folded it in half and added a few embellishments, including a fun quote cut from the Rusty Pickle papers.

Thursday, September 11, 2008
Creating your own title and embellishments with the Sept kit!
The September kit been such a fun kit to work with (and I'm not even CLOSE to being done!).
One of the first things I thought when I received my September kit was, "I can make my own unique title(s) and embellishment(s) with these Rusty Pickle papers and chalk pencils!" For this layout, I used bits and pieces of the Rusty Pickle papers to say exactly what I wanted about my son.
I cut out the part of the Rusty Pickle paper I wanted to use on my layout and....
colored them with the chalk pencils.
Then I used these pieces to create layout about my son's "cool" phase...:)
"totally cool"
Holly Pittroff
Take this challenge: Use the papers in the Sept kit to create your own title and/or embellishment(s) on a layout and post it in our gallery. I can't wait to see what you come up with!
Wednesday, September 10, 2008
September Sketch #2 Challenge
Check out Alicia's second sketch for September - loving this 2-picture layout!
Take this sketch challenge and upload it to our gallery. Check out what Laura and Kary made with the sketch -love the 2 different takes gals!
"Wes"
Laura Achilles"
"Cherish these moments"
Kary Lewis
Tuesday, September 9, 2008
Do you Doodle?
The I Am A Scrapaholic kit for September contains these totally fun papers by 7gypsies.
If you like to doodle these are the papers for you.
If you don't feel all that confident in doodling these are the papers for you.
The papers are black and white with doodles everywhere and all I did was add my own doodling accents with an orange and blue Sakura Glaze pen. This kind of ink is 3-D, intense in color and it made it look like I had worked very hard and I really didn't!
It's all in the paper and the punch out accents.
Thanks for visiting, Linda
Materials list:
Cardstock - Prism
Patterned paper – Pop Star/7gypsies and orange paper/We R Memory Keepers
Punch out elements – 7gypsies
Glaze pens – Sakura
Alphabet stamp – Stampin’ Up
Saturday, September 6, 2008
Die cuts to Die for
This months kits has something that not only have I never seen, but I would never have considered - Denim Die Cuts! Genius huh? My mind was racing with ideas for how to play with them. I went with three different techniques - fabric paint, markers and bleach (yes, bleach!)
I glued the die cut to a piece of cardstock, then I used a glittery fabric paint to add color and texture to the denim. After letting the fabric paint dry for 48 hours, I cut out the die cut (leaving a little black cardstock showing around the edge)and attached it to one of the Rusty Pickle tags from the kit. 
On my second die cut, I used Sakura Puffy Pens to color the denim, then I added a little puffy center (the top of the i from the thickers in this months kit!)
For the third die cut, I got out my bleach! I poured a little in a bottle cap then dunked the center of the die cut into it. I left the edges out so that I would get a gradual fade from edge to center. After the bleach was dry, I adhered the die cut to a piece of cardstock and ran it through the Cuttlebug with an embossing folder. The cardstock helps the denim hold the emboss and gives it support. I trimmed around the edges, added a jewelled brad to the center, then outlined it with Stickles. 

I'm addicted to Denim! I'll be looking for fun new ways to use it...
Friday, September 5, 2008
Sketch challenge #1 for September
We're starting September bloggin' out with one of Alicia's fabulous sketches (wow, she's inspiring!) Check out what 2 design team members made with her sketch and create your own!
Alicia's Sketch

"Altered Composition Book"
Elisa Kammerdiener
Supplies from Sept kit:
Rusty Pickle pattern papers
Other supplies:
Making Memories Ocean blue, Kiwi and pink flamingo paint
"1st day of K"
Holly Pittroff
Supplies from Sept kit:
Prism Cardstock: White
Rusty Pickle Pop Star/Miley, Zac
Inque Boutique Dipsy Doodlin’ stamp
American Crafts Tangerine Chit Chat Thickers
Around the Block chalk
Tsukineko Memento Dye Ink: Ladybug

