Sunday, August 31, 2008

September

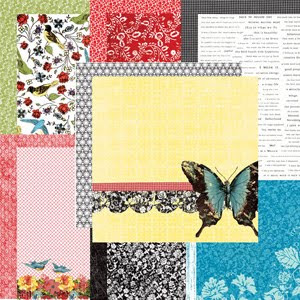
We are rockin' this month with Rusty Pickle's Pop Star papers! I cannot tell you how much fun this kit was to put together. Okay, I really enjoy putting the kits together but this one made me stretch a little more than usual. With black and white papers there are so many ways things can go...and besides black and white paper is not normally my thing. However when I saw this line back in February I instantly knew I wanted it! The ideas whirled around so fast. So prepare yourself for a colorful kit!
*
These papers are great on their own or colored. And there are so many different ways to color them. Please note that Rusty Pickle informed us that they were not designed to be used with paint...like that would stop me and I wouldn't be surprised to see a design team member or two use paints with them. LOL. They are designed to work with markers or pencils. And honestly, I let my daughter color on one with her crayons and they worked great.
Also in the kit this month are new puffy alphabet stickers from American Crafts -Chit Chat. Love the puffiness to them and also the actual font is fun with theses papers. And the color Tangerine is fun, bright, and packs a punch on layouts.
*
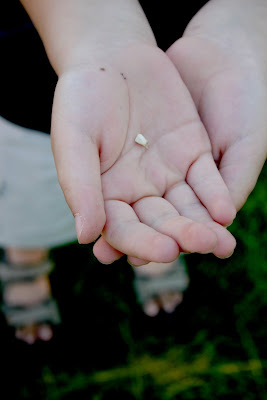
Again, this is a colorful kit. And one thing I love about Scrapaholics is that if something isn't the right color they change it. Note the hand on Visiting Therapist Susan Kleist's layout titled "sshh", she painted it white for her layout.
Watch for sketchs, tips, and tutorials from the design team. They are sure to inspire you!
*
~Lynn

Friday, August 29, 2008

August sketch challenge #4!

Alicia's 4th sketch for August is another beaut! Several of our design team members took this sketch challenge and created some amazing layouts using the oversized focal point. See what you can come up with and post in it our gallery.


"friends flowers"
Becky Thackson


"by the beach"
Marci Knecht

Wednesday, August 27, 2008

Journaling tip

When constructing a layout, many people argue that journaling is the most important thing along with the photo. Handwrtiting is the simplest way to do this, but many people are not happy with their writing. Allow your writing to blend into the background of your page by including it as part of your overall design. In my layout I added it to my existing concentric circles. It almost just looks like some black doodling and doesn't detract from the photo itself, but you still have the important text.
Alicia

Tuesday, August 26, 2008

Sketch challenge #3!

Here's another one of Alicia's fabulous sketches for August. Take this sketch challenge and post it in our gallery.


Check out what Nicole created using this sketch! Gorgeous!!

'adore them'
Nicole Stark

Friday, August 22, 2008

Brightening your photos using Adjustment Layers

Adjustment layers: an adjustment layer allows you to make changes to a layer without permanently affecting the layer below it (great for people like me who constantly change their mind). Adjustment layers can change many different aspects of a layer depending on what kind of adjustment layer you choose.


When you click on the adjustment layer icon in your menu it gives you a drop down menu of the different kinds of adjustment layer options.


Ok before you start getting all mixed up with all the Photoshop talk I’m going to show you one of my favorite things to do with adjustment layers;)

I use this technique almost everyday in some aspect when I proof my photos. I’m not that technical of a photographer and often my first thought is about getting the shot and not so much about what my settings are. So many times when I shoot in the automatic modes I end up with dark pictures like this one:

Not too bad of a picture but it’s on the dark side and there is no pop to the colors. To correct this I’m going to use the levels option in the adjustment layer menu


Click Adjustment layers icon > Levels
This will bring up the Levels menu.


By moving the sliders on the bottom (shown circled in red) of the input levels is what gives a little magic to your photo.


Moving the middle slider to the left brightens up your photos and then moving the left slider to the right a bit afterwards gives you depth back into your photo after you’ve brighten it a touch. How much you move these is going to be a little trial and error as well as your own personal taste, but here is an idea of how much I moved them as well as my after picture.


The picture is considerable better, but I still want to brighten it a little and get rid of the blue cast from my photo.

I’m going to click on my Adjustment layers icon again but instead of clicking on levels I’m going to choose the Photo Filter option.


The filter can be changed to many different colors but for this example I’m going to leave it on the Warming Filter. The color is that warm orange color and then I’ll change the density to about 15. Make sure the Preserve Luminosity box is checked and then click ok.


Ahhhhh! Much better:)

The beauty of proofing your photos this way is if you do something and you decide you don’t like it just take that adjustment layer to your little garbage can and you haven’t affected your original picture.


After you've gotten your photo the way you want it just simply Flatten the layers (Layer > Flatten Image) and then save your new photo with a new name. I usually leave mine with the original image number from my camera file and just add (edit) to the end. Saving both the original and the edit next to each other in my computer file.


Here are the three pictures side by side:


Hope you try the technique the next time you want to add a little something to your photos.

Tuesday, August 19, 2008

ATC's - what and why?

What is an ATC and why do we create them?
Maybe you have read or heard these referred to and you didn't know what they were.
Well, the letters stand for Artist Trading Cards and so they are just that, little cards that an artist will make to trade with other artists. If you were going to a convention or a class or belonged to an artist group, these would be created ahead of time to then be traded with others at the event. Typically, each person makes many of these and they are usually created according to a theme. You might pick a topic that is dear to your own heart or work in a medium that is typical of your own crafting. They are usually about 2 1/2" x 3 1/2" and so they are just tiny little canvases just waiting to be ART!
Mine were created around the products in the August I Am A Scrapaholic kit. The kit comes with some precut ATC cards just waiting for some art to be added.
For this first one I used the Inque Chipboard pieces as a stencil. I just cut off a small section of the negative of this one piece and added ink pads in the open spaces. When I was done with my card, these are basically orange shadows. The acrylic bird is colored with alcohol inks on the backside and a stamping on the front side.
I cut out one of the flowers from one of the 7gyspies prints and coated it with a clear paper glaze that I added the Mica flakes into that were part of a previous kit. You can also barely see a butterfly shape - I used the Heidi Swapp mask and rubbed Fluid Chalk stamp pads around that which then leaves the butterfly shape on the paper.

Thanks for visiting, Linda
Materials:
7 gypsies papers
Tim Holtz tickets
Acrylic bird
Making Memories stickers
Inque chipboard
Glimmer Mist spray
Dot stamp - Impress Rubber stamps
Fluid Chalk stamp pads
Alcohol inks - Ranger
Fern stamp - Hero Arts

Friday, August 15, 2008

August-OFBC challenge

Time for a new challenge. This month, your theme is to reflect on the year that you are having so far. Think about what your goals were at the start of the year, and what you plan to do for the rest of the year.

As always you have a sketch to use tyo inspire you. Interpret the sketch any way you want.


Here is my sample layout. I used glimmer mist directly onto the white chipboard. It is a little glossy, so be sure to allow plenty of drying time. You can also see how I moved the elements of the sketch a little to allow all of my bits and pieces to fit onto the layout.


Here is another sample done by Elisa


And another by Marcie:


Here is a layout from guest designer Mary:


I love how different layouts from the same sketch can look so differnt. :)

Alicia

***ETA Mary's layout

Thursday, August 14, 2008

ATC cards


I am not sure why I didn't jump on this ATC bandwagon along time ago. WOW these were fun to do! So yep you guessed it...my rave is going to be on ATC's! They are just small 3 1/2 x 4 1/2 sheets of cardstock decorated however you would like to do them. How easy is that. For the green ATC I decided to use the negative side of some chipboard and sprayed Glimmer Mist all over it. Once it dried I removed the chipboard. Then I took the round circles off that chipboard, glimmer misted them and then sealed it with crystal glaze. I love how the Glimmer mist sparkles on this ATC.
For the second one I used the Glimmer mist on the chipboard flower and just layered and layered goodies from the tag, to the tickets to the cute pink bird!
I am going to continue making these cute ATC's and how fun it would be to line them up along the bottom of a layout..dontcha think :)

Tuesday, August 12, 2008

A fun Glimer mist technique

When I got my first bottle of Glimmer mist I wasn't quite sure what to do with it. I mean there has to be more ways to use it then just spraying it on your projects to get droplets right. So of course me being me and just can't use anything the way it's intended for I have to find lots of ways to use it, mix it etc. I'm not sure there is a name for this technique as I just came up with it playing with the stuff, but I'm sure there are others who have either done the same thing or something similar.

Products that you will need:
ATG card
Glimmer mist (any color)
2 different color Tim Holtz ink pads
Tim Holtz sponge ink tool
Clear medium like (making memories clear glaze or crystal effects)
Rubber Stamps
Heating tool

Step 1. Take your ATG card and one of your Tim Holtz ink pads (I choose blue jean) and Sponge tool and ink up your ATG card


Step 2. Take your clear medium and squeeze out your desired amount.


Step 3. Take your Glimmer mist and shake it up and spray 5-8 sprays in with your clear medium.
Step 4. Mix it up. (If it isn't your desired color add another or a couple more sprays of glimmer mist. )
Step 5. Take a sponge paint brush and paint it all over your ATG card.
Step 6. Take out your rubber stamps and with nothing on them Stamp all over your ATG card. You can use one big stamp or several small ones.


Step 7. Take your other Tim Holtz ink (I chose a dark brown) and your sponge tool and ink all over your card again.

Step 8. Take out your heating tool and run a few passes of heat on your ATG card.


Step 9. Shake up your Glimmer mist once again and spray it into or onto something and do not mix it with anything this time. Now take out a clean sponge paint brush and brush the glimmer mist all over your ATG card.


Step 10. Take your heating tool once again and run a few passes of heat along your ATG card to help it dry faster. This is what it will look like when it's done.


Now you are ready to finish up your ATG card or you can use it like an embellishment like I did.


Here is a close up of it on the layout.

I would love to see how you use this technique or if you have a good glimmer mist technique come on over to the I am a scrapaholic message board and share your glimmer mist technique with us. I know we would all love to hear it and see some examples.

Sunday, August 10, 2008

August Sketch #2

August Sketch #2


Sketch #2 is another amazing sketch by our very own design team member Alicia Barry. It's a simple sketch that can be twisted and turned in lots of different ways. To see more of Alicia's sketches please visit her Page Plan's site


Here are 2 DT members' take on the sketch.


Queen of Hearts by
Marci Knecht


Beautiful by
Linda Beeson

We would love to see your take on the sketch so be sure to send us a link or upload into the I am a scrapaholic gallery. Plus don't forgot about our Blog Post Contest.

Blog Post Contest - with RAK!!

Leave a comment on the blog this month and your name will be entered into a hat for a RAK!
Leave 5 comments, and your name will be entered 5 times!

At the end of August, I'll pull a name from the "hat", and that person will receive a RAK from me!

You can't lose, and, BTW, the techniques and ideas from the DT on the blog are awesome!! Keep checking us out!

Good luck everyone...:)

Friday, August 8, 2008

Inque Chipboard and Butterfly Mask

I got to break out the August I Am A Scrapaholic kit and found some really, really cool things to play with. You can see so much of it right here on this card. I actually used the Sketch #1 from the other day for my inspiration.
The main elements on the card is the Core'dinations cardstock and the patterned papers, YUM! BUT, I picked up a piece of the Inque Chipboard and found it to be such a fun way to bring an interesting accent to this card. I sanded this piece slightly, then stamped the "dictionary" print stamp on it with black ink and then sprayed it with this super cool green Glimmer Mist (part of the kit). LOVE the look.
The butterfly is created from the Heidi Swapp Mask. These are black, cling, vinyl. I just placed it on the great Core'dinations cardstock and brushed it with a brown Fluid Chalk stamp pad. The mask was then removed to reveal the outline. I cut it out, leaving a border of the brown ink and filled in some of the areas with Stickles that was from a previous IAAS kit. The "BLISS" ticket is also part of the kit and I just inked the edges of that with stamp pads.
Thanks for your visit, Linda

Wednesday, August 6, 2008

FUN with the Heidi Swapp butterfly mini mask

I tried two different techniques using the Therapy Kit's Heidi Swapp butterfly mini mask and Lime Glimmer Mist.


For the first technique (bottom butterfly), I sprayed the mask with the Tattered Angels Glimmer Mist...


...and flipped it over onto my layout. I placed a clear stamping block over the mask. This created a watermark butterfly look on my layout. I filled in the holes in the masked image with a Ranger acrylic paint dabber (stream).


For the second technique, I used the mask as simply....a mask. :)


I cut the masked shape out with an exacto knife and adhered it to my layout.


Here is the finished product. Oh and BTW, this is my new nephew - Colby Burke. Isn't he just the cutest??